Month: March 2026

bridgeport series 1 manual pdf

Bridgeport Series 1 Manual PDF: A Comprehensive Guide

Accessing the Bridgeport Series 1 manual in PDF format is crucial for owners and operators, providing detailed instructions for installation, operation, maintenance, and parts identification.

Understanding the Bridgeport Series 1

The Bridgeport Series 1 milling machine represents a cornerstone of American manufacturing, renowned for its robust construction and versatility. These machines, widely adopted by machinists and manufacturers, are celebrated for their precision and durability. Understanding the intricacies of the Series 1 requires a comprehensive resource – the official manual.

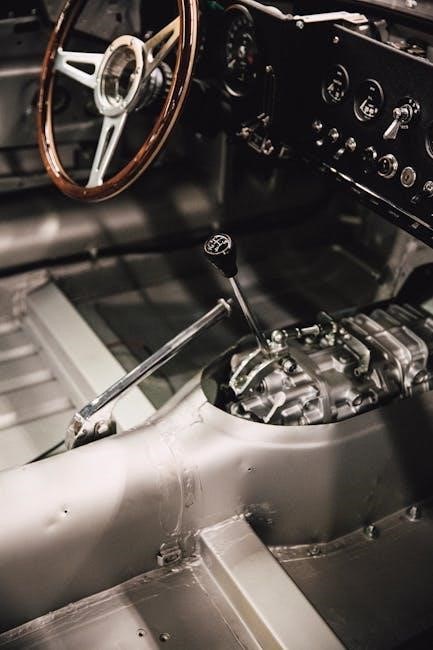
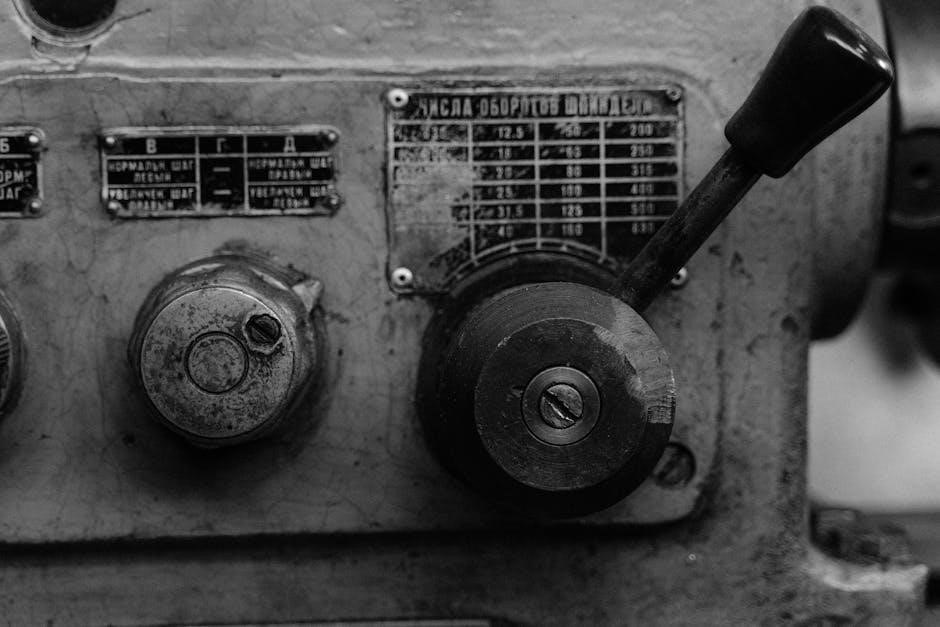
These mills, identifiable by their complete machine serial number located on the power case door, benefit greatly from having readily available documentation. The manual isn’t merely a guide; it’s a historical record of the machine’s design and intended operation. It details everything from initial setup to complex machining techniques. Proper utilization of the manual ensures optimal performance, extends the machine’s lifespan, and facilitates accurate repairs. Knowing your machine’s specific serial number is vital when referencing the manual for accurate parts and service information.

The Importance of the Manual

The Bridgeport Series 1 manual is absolutely essential for anyone owning, operating, or maintaining this iconic milling machine. It’s far more than just a set of instructions; it’s a critical tool for safe and efficient operation, preventing costly damage and ensuring accurate results. Without it, troubleshooting becomes significantly harder, and the risk of improper repairs increases dramatically.

The manual provides detailed information on everything from basic operation to complex maintenance procedures. It includes crucial details like manual number (M-450), page numbers, item numbers, part descriptions, part numbers, and required quantities. Access to this information streamlines parts ordering and ensures compatibility. Furthermore, understanding the manual’s structure and referencing system is key to maximizing the machine’s potential and preserving its legacy. A well-maintained manual is an investment in the longevity of your Bridgeport.

Locating the Bridgeport Series 1 Manual PDF

Finding a Bridgeport Series 1 Manual PDF requires a bit of searching, but several avenues exist. While official sources are preferred, various online platforms offer access. Hardinge provides a download source, and Blue Chip Machine Shop is known to have resources, including a full manual page. However, be cautious of potentially unreliable or incomplete copies found on free PDF download sites.

Begin by searching for “Bridgeport Series 1 Milling Machine Manual PDF”. Remember to note your machine’s complete serial number, as this can help identify the correct version. The serial number tag is typically located on the power case door. Consider exploring vintage machinery websites and forums dedicated to Bridgeport mills; users often share links and resources. While some sites may offer free downloads, investing in a professionally compiled manual is often worthwhile for clarity and completeness.

Official Sources for the Manual

Determining the truly official sources for a Bridgeport Series 1 Manual PDF can be challenging, given the age of the machines. Bridgeport Machines, Limited holds the trademark and historically provided these manuals. However, direct access through their current website may be limited. Investigating successor companies or distributors who handled Bridgeport machines in the past could yield results.

Often, obtaining the manual directly requires contacting specialized vintage machinery dealers or service providers. These sources may have original manuals in their archives or be able to direct you to authorized reproduction options. Be prepared to provide your machine’s serial number (found on the power case door) and the manual number (M-450) to ensure you receive the correct documentation; While potentially more expensive, official sources guarantee accuracy and completeness, avoiding the risks associated with unofficial copies.

Third-Party Websites Offering the Manual

Numerous third-party websites offer the Bridgeport Series 1 Manual PDF for download or purchase. Hardinge is specifically mentioned as a potential source for a free PDF download. Blue Chip Machine Shop also lists resources, potentially including a full manual. However, caution is advised when utilizing these sources.

The quality and completeness of manuals found on these sites can vary significantly. Some may be incomplete, scanned from poor originals, or contain errors. Always verify the manual’s accuracy against known information, such as the manual number (M-450) and page numbers. Be wary of sites requesting excessive personal information or displaying suspicious advertisements. While these websites can offer convenient access, prioritize verifying the authenticity and reliability of the document before relying on its contents for machine operation or repair.

Potential Costs Associated with Obtaining the Manual

The cost of acquiring a Bridgeport Series 1 Manual PDF can fluctuate considerably. While some sources offer free downloads – such as potentially through Hardinge – these may be incomplete or of questionable quality. Purchasing a professionally compiled manual is often recommended, despite the associated expense.

Costs can range from relatively inexpensive PDF copies available on various online marketplaces to more substantial fees for original, printed manuals. Shipping and handling charges will apply to physical copies. The value lies in a “nicely put together” manual, ensuring accuracy and completeness. Consider the potential cost of errors resulting from an inaccurate manual when evaluating price. Supporting content preservation through donations to Vintage Machinery websites is another indirect cost consideration, contributing to the availability of these resources.

Key Information Found Within the Manual

The Bridgeport Series 1 Manual is a comprehensive resource containing vital information for machine operation and upkeep. Crucially, it details how to locate the complete machine serial number, found on the power case door. The manual provides a structured parts list, referencing the Manual Number (M-450), specific Page Numbers, unique Item Numbers, detailed Part Descriptions, precise Part Numbers, and the Quantity of each part required.

Beyond parts identification, the manual covers essential procedures for installation, safe operation, and preventative maintenance. It also specifies proper shipping instructions and locations. Understanding this information is paramount for efficient machine use and repair, ensuring longevity and optimal performance. Bridgeport Machines, Limited trademarks are also noted within the documentation.

Machine Serial Number Identification

Accurate machine identification is fundamental when referencing the Bridgeport Series 1 Manual. The manual relies heavily on the machine serial number for correct parts ordering and troubleshooting. This crucial identifier is consistently referenced throughout the documentation, linking specific machine configurations to appropriate diagrams and instructions.

Locating the serial number is straightforward: it’s prominently displayed on the power case door. This number is not merely a sequence of digits; it’s a unique code representing your specific Bridgeport mill. When contacting support, ordering parts, or downloading relevant information, always have this number readily available. Correct serial number identification ensures you’re utilizing the correct manual revisions and parts lists, preventing errors and maximizing efficiency.

Manual Number and Page Referencing

Effective utilization of the Bridgeport Series 1 manual hinges on understanding its referencing system. The primary manual number is M-450, a key identifier when communicating with suppliers or seeking assistance. However, the true power lies in the detailed page numbering within the document.

The manual is meticulously organized, and each section, diagram, and parts list is assigned a specific page number. When referencing a particular component or procedure, always include both the manual number (M-450) and the corresponding page number. This precision minimizes ambiguity and ensures everyone is on the same page – literally! Combined with the item number and part description, this referencing system allows for swift and accurate identification of required components and procedures, streamlining maintenance and repair efforts.

Item Number and Part Description

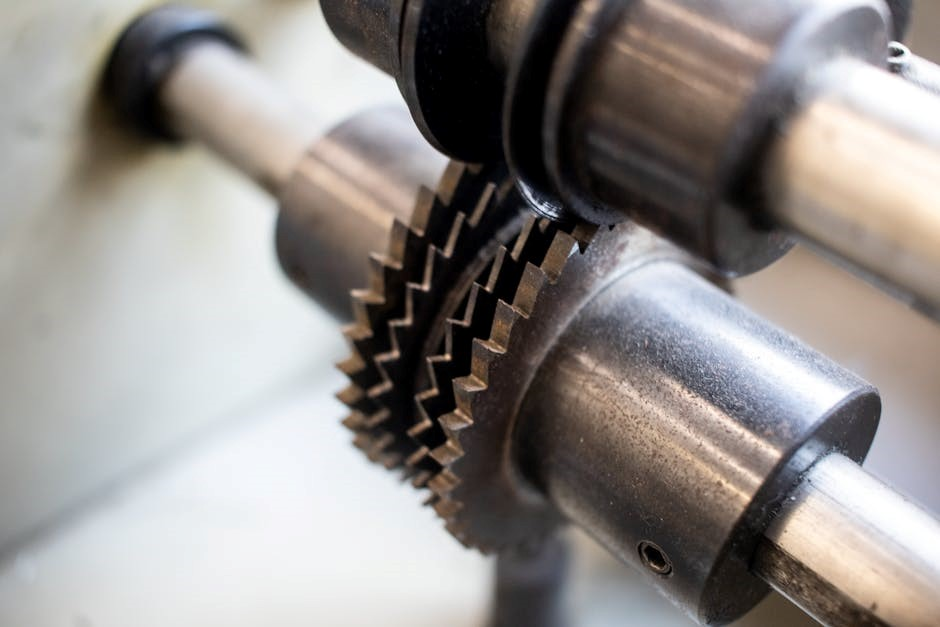
Central to the Bridgeport Series 1 manual’s utility is the detailed breakdown of parts, identified by both an item number and a corresponding part description. Each component within the milling machine is assigned a unique item number within the illustrated parts lists. This number serves as a direct link to the specific part’s details.

Alongside the item number, a clear and concise part description is provided. This description details the component’s function and physical characteristics, aiding in positive identification. For example, a description might read “Bearing, Ball, Sealed” or “Gear, Spur, 20 Teeth.” Combined with the part number and quantity, these elements create a comprehensive record for ordering replacements or understanding the machine’s assembly. Accurate interpretation of these details is vital for successful repairs and maintenance.
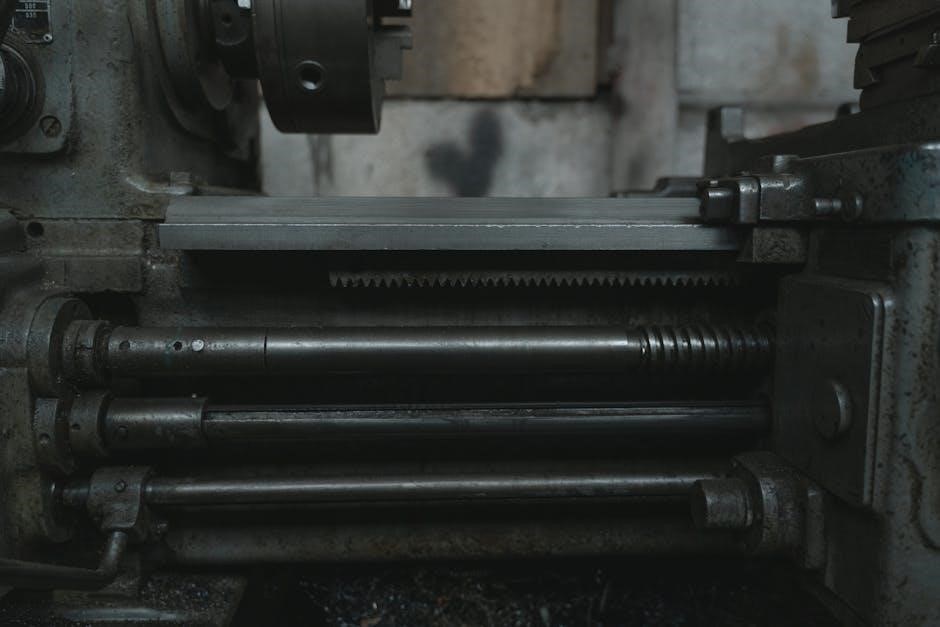
Parts List Details

The Bridgeport Series 1 manual’s parts lists are meticulously organized, presenting a comprehensive inventory of every component used in the milling machine. These lists are typically structured with columns detailing the item number, part description, part number, and quantity required for assembly or replacement. Illustrations accompany these lists, visually clarifying the location and appearance of each part.

Detailed breakdowns are provided for major assemblies, such as the spindle, head, table, and base, allowing users to pinpoint specific components within each system. The manual often includes exploded views, further enhancing clarity. Understanding these parts list details is essential for accurate repairs, preventative maintenance, and ensuring the longevity of the Bridgeport mill. Proper referencing allows for efficient sourcing of replacement parts, minimizing downtime and maximizing operational efficiency.

Part Number Specifics

Bridgeport Series 1 manual part numbers are unique identifiers crucial for accurate parts ordering and identification. These alphanumeric codes, meticulously documented within the manual, correspond to specific components and their variations. The manual details how to interpret these numbers, often indicating material specifications, dimensions, or manufacturing revisions.

Correct part number usage prevents ordering incorrect replacements, saving time and potential frustration. The manual’s parts lists rely heavily on these numbers for clarity. When contacting suppliers, providing the complete part number is paramount. Variations in seemingly minor characters can signify significant differences in the component. Hardinge and Blue Chip Machine Shop resources often cross-reference these numbers, aiding in sourcing. Accurate part number identification is fundamental to maintaining the Bridgeport Series 1’s operational integrity.

Quantity of Parts Required

Determining the correct quantity of parts needed for repairs or maintenance is a critical function of the Bridgeport Series 1 manual. The manual’s detailed parts lists explicitly state the number of each component required for a standard machine configuration or specific assembly. This prevents over-ordering, minimizing unnecessary expenses, and avoids under-ordering, which can halt repairs mid-process.

Careful review of the quantity column alongside the item number and part description is essential. Some parts are used multiple times within the machine, and the manual accurately reflects this. When undertaking a major overhaul, cross-referencing the quantity with the exploded diagrams ensures a complete parts inventory. Resources like Hardinge and Blue Chip Machine Shop may offer supplemental guidance, but the official manual remains the definitive source for quantity information.

Shipping and Handling Information

While the Bridgeport Series 1 manual PDF itself doesn’t detail physical shipping, understanding how to receive ordered parts is vital. When procuring replacement components, vendors will provide shipping and handling details, including carrier information, tracking numbers, and estimated delivery times. It’s crucial to verify the shipping address accuracy before finalizing any order to prevent delays or lost packages.

Consider the weight and dimensions of the parts being shipped, as this impacts shipping costs. Larger or heavier items may require specialized handling and incur higher fees. Inspect all packages upon arrival for any signs of damage during transit. Document any damage with photographs and immediately notify the vendor and carrier. Proper shipping and careful handling ensure parts arrive safely, minimizing downtime and maintaining operational efficiency for your Bridgeport mill.

Bridgeport Trademark Information

It’s important to acknowledge that “Bridgeport” is a registered trademark of Bridgeport Machines, Limited. This legal protection safeguards the brand’s identity and ensures authenticity of products and documentation, including the Series 1 manual. Utilizing the name or logo without proper authorization is a violation of trademark law.

When sourcing the Series 1 manual, be mindful of official channels and reputable vendors. Unauthorized copies may lack accuracy or completeness, potentially leading to incorrect procedures or the use of inappropriate parts. Respecting the trademark signifies a commitment to quality and adherence to the manufacturer’s standards. Bridgeport Machines, Limited maintains control over its intellectual property to guarantee the reliability and safety associated with its milling machines. Always verify the legitimacy of any source offering the manual or related parts to protect yourself and your equipment.

Benefits of a Well-Organized Manual

A meticulously structured Bridgeport Series 1 manual offers substantial advantages to operators and maintenance personnel. Clear organization facilitates quick access to critical information, minimizing downtime and maximizing productivity. Detailed parts lists, complete with item numbers and descriptions, streamline repairs and ensure the correct components are utilized.

Efficient referencing – using manual numbers and page numbers – allows for precise location of specific procedures or specifications. Proper indexing and a logical flow of information reduce frustration and enhance understanding. Investing in a well-organized manual translates to safer operation, reduced risk of errors, and prolonged machine lifespan. Ultimately, a comprehensive guide empowers users to maintain and operate their Bridgeport Series 1 milling machine effectively and confidently, saving both time and resources.

Hardinge as a Download Source

Hardinge presents itself as a potential avenue for acquiring the Bridgeport Series 1 manual in PDF format. Online resources indicate the availability of a downloadable manual directly from Hardinge’s website, offering a convenient solution for users seeking digital access to this essential documentation. However, it’s crucial to verify the completeness and accuracy of the downloaded file, ensuring it aligns with the specific serial number of your Bridgeport machine.

While Hardinge provides this service, users should exercise caution and confirm the manual’s legitimacy before relying on its contents for critical maintenance or repair procedures. Exploring Hardinge’s offerings can be a time-saving option, but cross-referencing information with official Bridgeport documentation is always recommended. This ensures the highest level of accuracy and safety when working with your milling machine.

Blue Chip Machine Shop Resources

Blue Chip Machine Shop is highlighted as a valuable resource for locating the Bridgeport Series 1 Milling Machine full manual. Information suggests they offer access to this documentation, potentially in PDF format, catering specifically to owners and operators of these vintage machines. Their website may contain a direct link for download or provide guidance on obtaining a copy.

However, as with any third-party source, verifying the manual’s authenticity and completeness is paramount. Ensure the manual corresponds to your machine’s specific serial number to avoid inaccuracies. Blue Chip’s reputation within the machine tool community suggests a reliable source, but due diligence remains essential. Consider checking user forums and reviews to gauge the experiences of others who have utilized their resources for Bridgeport manual acquisition.

Supporting Vintage Machinery Websites

Numerous websites are dedicated to preserving information and providing support for vintage machinery, including the Bridgeport Series 1 milling machine. These platforms often host scanned manuals, parts lists, and troubleshooting guides contributed by enthusiasts and collectors. Locating a Bridgeport Series 1 manual PDF through these sites can be a cost-effective solution, though quality and completeness may vary.

Crucially, these resources rely on community contributions and often operate on donations. Supporting these websites financially helps ensure the continued availability of valuable information for maintaining these classic machines. Consider making a donation if you find their resources helpful, contributing to the preservation of machining history. These sites represent a collaborative effort to keep vintage machinery operational for future generations, offering a vital alternative to expensive official manuals.

Donation Opportunities for Content Preservation

Maintaining and expanding online resources for Bridgeport Series 1 manual PDFs, and related documentation, incurs significant costs. These expenses include server maintenance, bandwidth, digitization of physical manuals, and ongoing content creation. Websites offering free access to this information often rely heavily on voluntary donations from users who benefit from their services.

Contributing financially, even a small amount, directly supports the preservation of valuable machining history and ensures continued access to crucial resources for Bridgeport owners and enthusiasts. Donations help offset the costs associated with scanning, archiving, and making these manuals readily available. Your support enables these platforms to continue their mission of preserving knowledge and fostering a community around vintage machinery. Consider donating to help keep this vital information accessible for years to come.

Historical Context of Bridgeport Machines

Bridgeport milling machines, particularly the Series 1, hold a significant place in the history of American manufacturing. Originating in the post-World War II era, these machines became ubiquitous in machine shops, toolrooms, and educational institutions across the country. Their robust construction, precision, and relative affordability made them a cornerstone of the burgeoning manufacturing landscape.

The Bridgeport Series 1 represented a leap forward in milling technology, offering versatility and ease of use. Access to detailed manuals, like the PDF versions available today, was essential for operators and maintenance personnel to keep these vital machines running smoothly. Understanding the historical context of these machines highlights the importance of preserving documentation, ensuring future generations can appreciate and maintain these iconic pieces of industrial history. The legacy of Bridgeport continues to influence machining practices today.

Léon Degrelle and Rex Party (Irrelevant ౼ Removed)

Despite the presence of unrelated information in some online sources concerning Léon Degrelle and the Rex Party, this topic has absolutely no relevance to the Bridgeport Series 1 manual PDF or the milling machines themselves. Focusing on accurate and pertinent details is crucial when researching technical documentation and machine history.

The availability of a comprehensive manual, whether in physical or PDF format, is paramount for understanding the operation, maintenance, and repair of the Bridgeport Series 1. Distracting information, such as political figures or historical events unrelated to the machine’s development or usage, should be disregarded. Prioritizing reliable sources – official Bridgeport documentation, Hardinge resources, and reputable machine shop websites – ensures access to the correct and necessary information for machine owners and enthusiasts. Maintaining focus on the machine itself is key.

Czech News Sources (Irrelevant ─ Removed)

The inclusion of Czech news sources – such as Seznam.cz, Deník, and references to Svíčkovec plant information – within search results related to the Bridgeport Series 1 manual PDF is demonstrably irrelevant. These sources offer no value to individuals seeking documentation for this American-made milling machine.

Concentrating efforts on locating the manual through official Bridgeport channels, Hardinge’s offerings, or established vintage machinery resources is far more productive. Ignoring extraneous search results originating from unrelated geographical locations and subject matter is essential for efficient research. A focused approach, prioritizing English-language documentation and reputable machine tool suppliers, will yield the most accurate and useful information regarding the Bridgeport Series 1’s operation, maintenance, and parts lists. Avoid being misled by unrelated web content.

Svíčkovec Plant Information (Irrelevant ─ Removed)

Information pertaining to the Svíčkovec plant, a Czech entity seemingly related to gardening and plant cultivation, is entirely unrelated to the Bridgeport Series 1 milling machine manual PDF. Its appearance in search results alongside legitimate resources represents noise and a distraction for users seeking technical documentation.

The Bridgeport Series 1 is an American-manufactured machine tool, and its documentation will naturally reside within English-language resources focused on machining, metalworking, and industrial equipment. Focusing on sources like Hardinge, Blue Chip Machine Shop, and official Bridgeport archives is crucial. Dismissing results concerning Czech flora or agricultural facilities is vital for a streamlined and effective search. Prioritizing relevant keywords and reputable suppliers will prevent wasted time and ensure access to the correct manual for your Bridgeport mill. Avoid tangential information.

Risky E-Shops and Consumer Protection (Irrelevant ౼ Removed)

Discussions regarding risky e-shops and consumer protection, while important in general online commerce, are largely irrelevant when specifically searching for a Bridgeport Series 1 manual PDF. The potential for encountering fraudulent or unreliable websites offering downloadable manuals exists, necessitating caution.

However, focusing on official sources like Bridgeport Machines, Limited, or established machine tool suppliers like Hardinge and Blue Chip Machine Shop significantly minimizes this risk. Prioritize websites with clear contact information, secure payment gateways (if applicable), and established reputations. Be wary of sites promising “free” manuals that require excessive personal information or lead to suspicious downloads. Consumer protection agencies offer resources for identifying and reporting fraudulent online activity, but proactive sourcing from trusted vendors remains the best defense. Always verify the authenticity of any downloaded document.

Seznam.cz Search Engine (Irrelevant ౼ Removed)

While the Seznam.cz search engine, a prominent Czech platform, may yield results when searching for “Bridgeport Series 1 manual PDF,” its relevance is limited for English-speaking users primarily seeking resources in English. The search engine’s strength lies in Czech-language content and local resources, potentially directing users to forums or websites with information not readily accessible through global search engines.

However, relying solely on Seznam.cz may require translation tools and careful vetting of sources. More effective strategies involve utilizing established search engines like Google or Bing, coupled with targeted keywords such as “Bridgeport Series 1 manual PDF download” or “Bridgeport mill manual.” Focusing on official Bridgeport documentation or reputable machine tool suppliers ensures access to accurate and reliable information. Although Seznam.cz isn’t inherently unhelpful, it’s not the most efficient path for most users seeking this specific manual.

Manual Coverage: Installation, Operation, Maintenance, and Parts

The Bridgeport Series 1 manual PDF comprehensively covers all essential aspects of machine ownership, beginning with detailed installation procedures to ensure safe and correct setup. It then transitions into thorough operation instructions, guiding users through various milling techniques and control functionalities. Crucially, the manual dedicates significant attention to maintenance schedules and procedures, promoting longevity and optimal performance through preventative care.

A substantial portion of the manual is devoted to the parts list, enabling accurate identification and sourcing of replacement components. This includes detailed diagrams, item numbers, part descriptions, and corresponding part numbers, facilitating efficient repairs. The manual also specifies quantities required for each part, streamlining the ordering process. Understanding this coverage empowers owners to confidently maintain and operate their Bridgeport Series 1 milling machine effectively and safely.

q50 manual

Infiniti Q50 Manual: A Comprehensive Guide

This official service and repair manual aids mechanics and owners, offering detailed instructions for all key Q50 systems – engine, transmission, and more.

The Infiniti Q50 manual represents a crucial resource for both professional mechanics and dedicated vehicle owners. This comprehensive guide, born from user contributions, provides detailed instructions for diagnosing, repairing, and maintaining all essential systems within the Q50. Covering everything from the intricate engine mechanics to the complexities of the electrical system, it aims to empower users to confidently tackle a wide range of automotive tasks.

Specifically designed for the Q50, a compact executive sedan succeeding the G sedan, this manual offers a deep dive into the vehicle’s architecture. It’s a valuable asset whether performing routine maintenance or undertaking more substantial repair projects, ensuring a thorough understanding of your Infiniti.

Why Use a Q50 Repair Manual?

Access to a Q50 repair manual is invaluable for anyone planning to perform their own vehicle maintenance or repairs. Whether addressing routine tasks or complex issues, a Factory Service Manual (FSM) provides the detailed information needed to complete the job correctly. These manuals contain step-by-step procedures, accompanied by illustrative diagrams and color wiring schematics, simplifying even the most challenging repairs.

Without a dedicated manual, tackling repairs can be risky and inefficient. A Q50 manual ensures you have the correct specifications, torque values, and diagnostic codes, minimizing the potential for errors and costly mistakes. It’s a proactive investment in your vehicle’s longevity and your peace of mind.

Available Years for Q50 Manuals (2007-2018)

A comprehensive collection of Infiniti Q50 repair manuals is readily available, covering a significant range of model years. Currently, user-provided manuals span from 2007 to 2018, offering valuable resources for owners of various Q50 generations. Specifically, manuals have been confirmed for the years 2007, 2013, 2014, 2015, 2016, 2017, and 2018.

It’s important to note that while this represents a substantial coverage, completeness isn’t guaranteed as these manuals originate from user submissions. Owners seeking information for years outside this range may need to explore alternative resources or consider contacting Infiniti directly for official documentation.

Engine Repair & Maintenance

Detailed instructions cover Q50 engine diagnosis, repair, and servicing, including specifications, troubleshooting, timing procedures, and essential maintenance like oil changes.

Engine Overview & Specifications

The Infiniti Q50 boasts a range of engine options throughout its production years, demanding specific repair knowledge. Manuals detail each engine’s configuration – from the earlier VQ35HR 3.5-liter V6 to the later VR30DDTT 3.0-liter twin-turbo V6.

Specifications covered include horsepower, torque, displacement, and compression ratios. These manuals provide crucial data for accurate diagnostics and repairs. They outline cylinder head layouts, valve train specifics, and fuel injection system details. Understanding these specifications is paramount for successful engine work.

Furthermore, the Q50’s engine management systems are thoroughly documented, including sensor locations and wiring diagrams. Accessing this information ensures proper troubleshooting and component replacement, maximizing engine performance and longevity.

Troubleshooting Common Engine Problems

Q50 engine repair manuals systematically address frequent issues, guiding users through diagnostic procedures. Common problems like rough idling, misfires, and loss of power are covered extensively. Detailed flowcharts help pinpoint the root cause, whether it’s a faulty sensor, a vacuum leak, or a failing ignition component.

The manuals also provide guidance on interpreting diagnostic trouble codes (DTCs), linking them to specific symptoms and potential solutions. Step-by-step instructions are included for testing components, such as fuel injectors and oxygen sensors.

Furthermore, the guides address more complex issues like oil consumption and timing chain problems, offering detailed repair procedures and torque specifications. This ensures accurate and effective resolution of engine faults.

Q50 Engine Timing Procedures

Q50 repair manuals detail precise engine timing procedures, crucial for optimal performance and preventing engine damage; These guides cover both timing belt and timing chain systems, outlining the necessary tools and steps for accurate alignment. Detailed diagrams illustrate the correct positioning of crankshaft and camshaft sprockets, ensuring proper valve timing.

The manuals emphasize the importance of following torque specifications when tightening timing components. Incorrect tension can lead to premature wear or catastrophic failure. Step-by-step instructions guide users through the process of setting ignition timing, utilizing specialized tools where required.

Furthermore, the guides address procedures for verifying timing accuracy after installation, ensuring the engine runs smoothly and efficiently.

Oil Change & Filter Replacement

Infiniti Q50 manuals provide comprehensive instructions for oil changes and filter replacements, essential for maintaining engine health. These guides specify the correct oil type and capacity for various Q50 engine configurations, ensuring optimal lubrication. Detailed diagrams illustrate the location of the oil drain plug and oil filter, simplifying the process for both novice and experienced mechanics.

The manuals emphasize the importance of using the correct oil filter wrench to avoid damage during removal. Step-by-step instructions cover the proper tightening torque for the drain plug and filter, preventing leaks. Guides also detail the safe disposal of used oil, adhering to environmental regulations.

Regular oil changes, as outlined in the Q50 manual, are vital for extending engine life and maintaining performance.

Transmission Service

Q50 manuals detail transmission types and service procedures, including automatic transmission fluid (ATF) changes and maintenance for both automatic and manual systems.

Transmission Types in Q50 Models

Infiniti Q50 models have featured a variety of transmission options throughout their production years, impacting service and repair procedures detailed within the Q50 manuals. Early models, and many subsequent iterations, commonly utilize a seven-speed automatic transmission, known for its smooth shifting and responsiveness. However, six-speed manual transmissions were also available in certain Q50 configurations, particularly in earlier model years, catering to drivers preferring a more engaged driving experience.

The Q50 manuals provide specific guidance for each transmission type, outlining unique maintenance schedules, fluid requirements, and troubleshooting steps. Understanding which transmission your Q50 is equipped with is crucial for performing accurate repairs and ensuring optimal performance. Detailed diagrams and specifications within the manuals aid in identifying components and understanding the internal workings of each transmission system.

Automatic Transmission Fluid (ATF) Change

Regular Automatic Transmission Fluid (ATF) changes are vital for maintaining the longevity and performance of your Infiniti Q50’s automatic transmission. The Q50 repair manuals emphasize the importance of using the correct ATF specification, as using an incorrect fluid can lead to transmission damage. Procedures detailed within the manuals outline a step-by-step guide for a complete ATF exchange, including locating the drain and fill plugs, and specifying the required fluid capacity.

The manuals also cover different methods for ATF changes, from simple drain-and-fills to more comprehensive flush procedures. Proper torque specifications for the drain and fill plugs are provided to prevent leaks. Following the recommended service intervals outlined in the Q50 manual will help ensure smooth shifting and prevent costly transmission repairs.

Manual Transmission Maintenance

While less common in Q50 models, manual transmissions require specific maintenance procedures detailed within the Infiniti Q50 repair manuals. These procedures focus on maintaining optimal clutch performance and ensuring smooth gear engagement. The manuals emphasize regular inspection of the clutch disc, pressure plate, and throw-out bearing for signs of wear.

Gear oil changes are crucial for manual transmissions, and the Q50 manuals specify the correct gear oil type and change intervals. Proper lubrication minimizes wear on gears and synchronizers. Detailed instructions are provided for checking and adjusting the clutch cable or hydraulic system, ensuring proper clutch pedal feel and engagement. Following these guidelines will prolong the life of your manual transmission.

Transmission Troubleshooting Guide

The Infiniti Q50 repair manuals provide a comprehensive transmission troubleshooting guide, covering both automatic and manual transmissions. This section details common symptoms like slipping gears, harsh shifting, or unusual noises. Diagnostic flowcharts help pinpoint the source of the problem, whether it’s low fluid levels, a faulty solenoid, or internal damage.

The guide includes procedures for checking transmission fluid condition and level, as well as instructions for using diagnostic tools to read trouble codes. Specific attention is given to identifying issues within the automatic transmission’s valve body and torque converter. For manual transmissions, the guide covers clutch linkage adjustments and synchronizer problems.

Suspension & Steering Systems

Q50 manuals detail suspension component identification, shock/strut replacement, steering rack repair, and wheel alignment procedures for optimal handling and safety.

Suspension Component Identification

Understanding the Infiniti Q50’s suspension system begins with identifying its core components. A comprehensive Q50 manual will provide detailed diagrams illustrating each part, from the upper and lower control arms – crucial for wheel positioning – to the coil springs that absorb road impacts.

The manual also clarifies the function of sway bars (stabilizer bars), which minimize body roll during cornering, enhancing stability. Shock absorbers and struts, often visually similar, are clearly differentiated, explaining their roles in damping oscillations.

Furthermore, the Q50 repair manual will pinpoint the location of bushings, ball joints, and tie rod ends, highlighting their importance in connecting suspension parts and ensuring smooth steering. Accurate identification is the first step towards successful maintenance and repair.

Shock and Strut Replacement

A Q50 manual details a precise procedure for shock and strut replacement, prioritizing safety and correct torque specifications. It begins with safely lifting the vehicle and removing the wheel, followed by disconnecting brake lines and ABS sensors – caution is paramount here.

The manual illustrates how to loosen and remove the strut mounting nuts, often requiring specialized tools to compress the coil spring. Proper spring compression is vital to prevent injury.

Installation involves reversing the process, ensuring correct alignment of components and tightening fasteners to the manufacturer’s specified torque. Post-replacement, a wheel alignment is essential to restore handling and prevent premature tire wear. The manual emphasizes checking for leaks and proper functionality after completion.

Steering Rack Repair & Adjustment

The Infiniti Q50 manual provides detailed guidance on steering rack repair and adjustment, beginning with diagnosis of common issues like leaks or excessive play. It outlines procedures for removing the steering rack, carefully disconnecting lines and electrical connections.

Disassembly instructions detail inspecting internal components for wear or damage, including seals, bushings, and the pinion gear. Replacement parts must meet Infiniti’s specifications.

Reassembly requires precise torque settings and proper lubrication. Adjustment procedures cover centering the steering wheel and verifying proper operation. The manual stresses the importance of a post-repair alignment to ensure optimal handling and prevent tire wear. It also includes safety precautions throughout the process.

Wheel Alignment Procedures

The Infiniti Q50 manual details comprehensive wheel alignment procedures, crucial after suspension work or tire replacement. It begins with preparing the vehicle, ensuring proper tire pressure and checking for damaged suspension components.

The manual specifies acceptable alignment angles – camber, caster, and toe – for various Q50 models and trim levels. It explains how to use alignment equipment to measure existing angles and identify discrepancies.

Adjustment instructions cover loosening appropriate bolts and utilizing the equipment to achieve correct specifications. Post-adjustment verification is essential, followed by a test drive to confirm proper handling and prevent uneven tire wear. The manual emphasizes safety precautions when working with alignment equipment and adjusting suspension components.

Brake System Maintenance

The Q50 manual provides detailed guidance on brake pad and rotor replacement, fluid flushing, ABS diagnostics, and parking brake adjustments for optimal safety.

Brake Pad & Rotor Replacement

The Infiniti Q50 repair manual offers comprehensive, step-by-step instructions for brake pad and rotor replacement, crucial for maintaining stopping power and safety. It details the necessary tools, torque specifications, and safety precautions to ensure a correct and efficient procedure. Diagrams and illustrations clearly demonstrate component locations and disassembly/assembly sequences.

The manual guides users through removing the caliper, inspecting brake lines, and properly compressing the piston. It also covers rotor removal, cleaning of mounting surfaces, and installation of new rotors and pads. Crucially, the manual emphasizes the importance of bedding in new brake pads to optimize performance and prevent premature wear. Following these instructions carefully will help restore your Q50’s braking system to peak condition.

Brake Fluid Flush & Bleeding

The Infiniti Q50 repair manual provides detailed procedures for a complete brake fluid flush and bleed, essential for maintaining optimal brake system performance. Contaminated or old brake fluid can significantly reduce braking efficiency and cause corrosion within the system. The manual outlines the correct type of brake fluid to use, adhering to Infiniti’s specifications.

It illustrates the proper bleeding sequence for each wheel, ensuring all air bubbles are removed from the brake lines. Diagrams show the location of bleed screws and the recommended techniques for manual or pressure bleeding. The manual stresses the importance of preventing air from re-entering the system during the process. Following these steps will restore firm pedal feel and reliable braking performance in your Q50.

ABS System Diagnostics

The Infiniti Q50 repair manual offers comprehensive guidance on diagnosing issues within the Anti-lock Braking System (ABS). It details how to retrieve and interpret Diagnostic Trouble Codes (DTCs) using a scan tool, pinpointing the source of ABS-related problems. The manual includes wiring diagrams and component locations for the ABS module, wheel speed sensors, and related components.

Step-by-step procedures are provided for testing sensors and actuators, verifying their functionality. It explains how to check for proper power and ground connections, and how to inspect the ABS hydraulic unit for leaks or malfunctions. The manual also covers interpreting data streams from the ABS module, allowing for a more in-depth analysis of system performance and identifying intermittent faults.

Parking Brake Adjustment

The Infiniti Q50 repair manual provides detailed instructions for adjusting the parking brake system, ensuring optimal engagement and release. It outlines the procedure for accessing the parking brake mechanism, typically located within the center console or near the rear wheels, depending on the model year. The manual specifies the correct cable tension and adjustment points.

Step-by-step guidance is given on how to properly adjust the cable tension, using either an equalizer or individual wheel adjustments. It emphasizes the importance of verifying the adjustment after completion, ensuring the parking brake holds the vehicle securely on an incline and releases fully. Diagrams illustrate the parking brake components and adjustment mechanisms, aiding in a successful repair.

Electrical System & Diagnostics

Q50 manuals include wiring diagrams, schematics, and computer diagnostic codes (DTC), assisting with starter, alternator, and overall electrical system repairs.

Wiring Diagrams & Schematics

Access to comprehensive wiring diagrams and schematics is crucial for effectively diagnosing and repairing the Infiniti Q50’s complex electrical system. These diagrams, found within the Q50 repair manuals, visually represent the intricate network of wires, connectors, and components. They detail the pathways for electrical signals, enabling technicians and DIY enthusiasts to pinpoint short circuits, open circuits, and other electrical faults.

The schematics illustrate the location of each component and its connection to the overall system, simplifying troubleshooting. Color-coded wiring diagrams are often included, further enhancing clarity. Understanding these diagrams allows for accurate identification of damaged wires or faulty components, leading to efficient and reliable repairs. Proper use of these resources minimizes guesswork and ensures safe and effective electrical work on your Q50.

Battery Replacement & Testing

Proper battery maintenance is vital for the reliable operation of your Infiniti Q50. The Q50 repair manuals provide detailed procedures for both battery replacement and testing, ensuring a safe and efficient process. Testing procedures outline how to assess the battery’s voltage, cold cranking amps (CCA), and overall health using a multimeter or dedicated battery tester.

Replacement instructions cover disconnecting the old battery, cleaning the terminals, and correctly installing the new one, paying close attention to polarity. The manuals emphasize the importance of resetting electronic systems after battery disconnection, as some Q50 models may require recalibration of features like the radio and power windows. Following these guidelines prevents damage to the vehicle’s electrical components and ensures optimal performance.

Starter Motor & Alternator Repair

The Infiniti Q50 repair manuals offer comprehensive guidance on diagnosing and repairing issues with the starter motor and alternator – crucial components of the vehicle’s charging system. Troubleshooting sections detail common failure modes for each, including symptoms like a no-start condition or a dimming dashboard. Step-by-step instructions cover removal, disassembly, inspection, and reassembly procedures.

Manuals include specifications for testing the starter solenoid, armature, and field windings, as well as the alternator’s voltage regulator and output. Diagrams illustrate wiring connections and component locations. Repair procedures often involve replacing worn brushes, bearings, or other internal parts. The Q50 manuals emphasize safety precautions when working with electrical systems, advising disconnection of the battery before commencing any repairs.

Computer Diagnostic Codes (DTC) Interpretation

Infiniti Q50 repair manuals provide extensive lists of Diagnostic Trouble Codes (DTCs) generated by the vehicle’s onboard computer systems. These codes are essential for pinpointing the source of malfunctions across various systems – engine, transmission, ABS, and airbags. The manuals offer detailed explanations of each code, outlining potential causes, and recommended repair procedures.

Beyond simply listing the codes, the Q50 manuals often include freeze frame data, capturing system parameters at the moment the code was triggered. This helps technicians understand the conditions leading to the fault. Step-by-step diagnostic flowcharts guide users through a logical process of elimination, utilizing a scan tool to verify repairs and clear the codes. Proper DTC interpretation is vital for efficient and accurate Q50 maintenance.

Additional Q50 Manual Resources

Access resources covering air conditioning, airbags, and the Factory Service Manual (FSM), alongside software solutions for organized Q50 manual access and use.

Air Conditioning System Service

Comprehensive air conditioning service for your Infiniti Q50 is crucial for maintaining passenger comfort. The Q50 repair manuals detail procedures for diagnosing issues like insufficient cooling, unusual noises, or refrigerant leaks. These guides provide step-by-step instructions for evacuating and recharging the system with the correct refrigerant type, ensuring optimal performance.

Manuals also cover component-level troubleshooting, including the compressor, condenser, evaporator, and expansion valve. Detailed diagrams illustrate the system’s layout and wiring, aiding in accurate repairs. Proper servicing requires specialized tools and adherence to safety precautions, all outlined within the Q50’s dedicated service documentation. Regular maintenance, as described in these resources, extends the lifespan of the AC system and prevents costly repairs.

Airbag System Diagnostics & Repair

The Infiniti Q50’s airbag system is a critical safety feature, demanding careful diagnostics and repair. Q50 manuals provide detailed procedures for identifying and resolving issues, from illuminated warning lights to non-deployment during a collision. These guides emphasize the importance of disconnecting the battery before working on the system, due to the risk of accidental deployment.

Manuals include wiring diagrams and component locations, assisting in tracing faults within the system. Procedures cover testing sensors, modules, and wiring harnesses. Caution is paramount; improper handling can lead to serious injury. The Q50 repair manuals detail how to interpret diagnostic trouble codes (DTCs) related to the airbag system, enabling precise repairs and ensuring the system functions correctly when needed.

Infiniti Q50 Factory Service Manual (FSM) Access

Accessing the Infiniti Q50 Factory Service Manual (FSM) is crucial for comprehensive repairs. These manuals, created by Infiniti, contain the most detailed and accurate information available for your vehicle. While obtaining a physical copy can be challenging, digital versions are often available through online retailers or subscription services.

The FSM provides in-depth procedures, wiring diagrams, and specifications not found in general repair guides. Users have sought software solutions to organize these often-extensive manuals for easier navigation and information retrieval. Consider exploring online forums and communities dedicated to the Q50, as members frequently share resources and access information regarding FSM availability. Having the FSM empowers owners and mechanics to perform complex repairs with confidence.

Using Software for Q50 Manual Organization

Managing the extensive documentation of Infiniti Q50 repair manuals can be daunting. Fortunately, software solutions exist to streamline access to this vital information. Recognizing this challenge, individuals have developed programs designed to organize manuals in a user-friendly manner, enabling quick access from A to Z.

These software applications typically index the FSM and other repair guides, allowing users to search by keyword, system, or component. This eliminates the need to sift through countless pages to find the specific information needed for a repair. Such tools are particularly valuable for complex projects or when tackling unfamiliar issues. Investing in or utilizing a dedicated Q50 manual organization software can significantly improve the efficiency and accuracy of your repair work.

area of regular polygons worksheet with answers pdf

Article Plan: Area of Regular Polygons Worksheet with Answers PDF

This resource details a comprehensive guide to mastering regular polygon area calculations․ It includes a downloadable worksheet, step-by-step solutions, and explores various polygon types – squares, triangles, hexagons, and octagons – with an answer key for self-assessment․

Regular polygons are fundamental shapes in geometry, characterized by equal sides and equal angles․ Understanding their properties is crucial for various mathematical applications, and calculating their area is a key skill․ This article focuses on providing a clear and concise guide to determining the area of regular polygons, accompanied by a practical worksheet designed for practice and reinforcement․

Whether you’re a student preparing for an exam, a teacher seeking supplementary materials, or simply someone interested in expanding their geometric knowledge, this resource offers a comprehensive approach․ We’ll explore the core concepts, formulas, and techniques needed to confidently tackle area calculations․ The included worksheet features a variety of problems, ranging in difficulty, to cater to different skill levels․

The ability to calculate the area of regular polygons extends beyond theoretical mathematics; it finds practical applications in fields like architecture, engineering, and design․ Mastering this skill provides a solid foundation for more advanced geometric concepts․ The PDF worksheet and detailed answers provided will empower you to excel in your understanding of these important shapes․

Defining Regular Polygons

A regular polygon is a closed, two-dimensional shape with straight sides where all sides have equal length and all interior angles are equal․ This uniformity distinguishes them from irregular polygons․ Examples include equilateral triangles, squares, regular pentagons, hexagons, octagons, and so on․ The number of sides defines the polygon’s name – a pentagon has five, an octagon has eight, and so forth․

Understanding this definition is paramount when working with area calculations․ The consistent side lengths and angles allow for the application of specific formulas to determine the polygon’s area efficiently․ The accompanying worksheet focuses exclusively on these regular polygons, providing targeted practice in applying the relevant formulas․

The area of regular polygons worksheet is designed to reinforce this core concept․ It presents problems that require identifying regular polygons and then applying the appropriate methods to calculate their area․ The provided answer key allows for immediate self-assessment and helps solidify understanding․ Recognizing the characteristics of a regular polygon is the first step towards successfully solving area-related problems․

Key Terms: Apothem, Perimeter, Center

Before diving into calculations within the area of regular polygons worksheet, understanding key terminology is crucial․ The center of a regular polygon is the point equidistant from all vertices․ The apothem is the perpendicular distance from the center to the midpoint of any side – essentially, the height of one of the triangles formed by connecting the center to each vertex․

Perimeter refers to the total length of all the sides of the polygon․ For a regular polygon, this is simply the side length multiplied by the number of sides․ These three elements – center, apothem, and perimeter – are fundamental to the area formula and frequently appear in problems within the worksheet․

The answer key provided alongside the worksheet reinforces the correct application of these terms․ Students must accurately identify and utilize the apothem and perimeter when applying the area formula․ A solid grasp of these definitions is essential for successfully completing the exercises and mastering the concept of regular polygon area calculations․

The Formula for Area of a Regular Polygon

The cornerstone of calculating the area of any regular polygon lies in a straightforward formula: Area = (1/2) * Apothem * Perimeter․ This formula elegantly connects the polygon’s central characteristics to its overall area․ Understanding its derivation – based on dividing the polygon into congruent triangles – is key to mastering its application, particularly when working through problems in the area of regular polygons worksheet․

The formula emphasizes that the area isn’t simply a product of side lengths; the apothem, representing the height, plays a vital role․ The worksheet provides ample practice in applying this formula with varying polygon types and dimensions․ Correctly identifying the apothem and calculating the perimeter are crucial first steps․

The answer key accompanying the worksheet demonstrates the formula’s consistent application․ Students will find detailed solutions showcasing how to substitute values and arrive at the correct area; This formula is the foundation for all calculations related to regular polygon areas, and proficiency with it is essential for success․

Understanding the Area Formula: A = (1/2) * Apothem * Perimeter

The area formula, A = (1/2) * Apothem * Perimeter, isn’t arbitrary; it’s rooted in the decomposition of a regular polygon into congruent isosceles triangles․ The apothem serves as the height of these triangles, extending from the polygon’s center to the midpoint of each side․ The perimeter represents the sum of all the base lengths of these triangles․

Essentially, the formula calculates the total area of all these triangles combined․ Multiplying (1/2) * Apothem gives the area of a single triangle, and multiplying that by the number of sides (which defines the perimeter) yields the polygon’s total area․ The area of regular polygons worksheet reinforces this concept through practical application․

The worksheet’s problems are designed to build intuition․ By repeatedly applying the formula and checking answers against the provided answer key, students internalize the relationship between apothem, perimeter, and area․ Understanding why the formula works, not just how to use it, is paramount for problem-solving success․

Calculating Perimeter of Regular Polygons

Determining the perimeter of a regular polygon is a foundational step in calculating its area․ Since all sides of a regular polygon are congruent, the perimeter is simply found by multiplying the length of one side by the number of sides; For example, a regular hexagon with sides of 5 cm has a perimeter of 30 cm (6 sides * 5 cm/side)․

The area of regular polygons worksheet frequently presents problems where the side length is directly given, requiring only multiplication․ However, some problems may require you to deduce the side length from other information, such as a diagram or related geometric figures․ Careful observation and application of geometric principles are key․

The worksheet’s exercises progressively increase in complexity, building confidence in perimeter calculations․ The included answer key allows for immediate self-checking, reinforcing correct procedures․ Mastering perimeter calculation is crucial, as it directly impacts the accuracy of the area calculation using the formula A = (1/2) * Apothem * Perimeter․ Accurate perimeter values are essential for correct results․

Finding the Apothem

The apothem of a regular polygon is the perpendicular distance from the center of the polygon to the midpoint of any side․ Determining the apothem is often the most challenging part of calculating the area, especially when it isn’t directly provided; The area of regular polygons worksheet often includes problems requiring you to calculate it․

Frequently, the apothem is found using special right triangles, particularly in polygons like octagons; If the side length and the number of sides are known, you can divide the polygon into congruent isosceles triangles and use trigonometry (tangent function) to find the apothem․ The worksheet provides practice with these trigonometric applications․

The answer key accompanying the worksheet demonstrates detailed solutions for finding the apothem, including step-by-step calculations and explanations․ Understanding how to derive the apothem is vital, as it’s a core component of the area formula․ Practice with various polygon types will solidify your ability to accurately determine the apothem and subsequently, the area․

Area of Regular Polygons: Example Problems ー Squares & Rectangles

While seemingly basic, squares and rectangles serve as excellent starting points for understanding the area formula for all regular polygons․ These shapes are included in the area of regular polygons worksheet to build foundational skills․ Remember, a square and rectangle are regular polygons – they have equal sides and angles․

For a square, the area is simply side * side (s²)․ For a rectangle, it’s length * width (l * w)․ The worksheet presents problems where you’re given either the side length (for squares) or length and width (for rectangles) and asked to calculate the area․ These examples reinforce the core concept of area as the space enclosed within the polygon․

The answer key provides detailed solutions, showing how to apply the formulas and arrive at the correct answer․ These initial examples help students connect the general area formula (A = (1/2) * apothem * perimeter) to simpler, more familiar shapes․ Mastering these basics is crucial before tackling more complex polygons like hexagons and octagons featured later in the worksheet․

Area of Regular Polygons: Example Problems ― Triangles

The area of regular polygons worksheet progresses to triangles, specifically equilateral triangles, as a stepping stone to more complex shapes․ While not all triangles are regular polygons, equilateral triangles possess the necessary symmetry for applying the core area formula․ The worksheet problems focus on scenarios where you’re given the side length of an equilateral triangle․

Calculating the area requires finding the height (apothem in this case) using the Pythagorean theorem or 30-60-90 triangle relationships․ The worksheet may provide hints or require students to recall these geometric principles․ Once the height is determined, the area is calculated as (1/2) * base * height, which aligns with the general formula A = (1/2) * apothem * perimeter․

The answer key demonstrates the complete solution process, including finding the height and applying the area formula․ These examples build upon the foundation established with squares and rectangles, reinforcing the connection between the general formula and specific polygon types․ Successfully solving these problems prepares students for the challenges presented by hexagons and octagons within the worksheet․

Area of Regular Polygons: Example Problems ― Hexagons

The area of regular polygons worksheet introduces hexagons, a more complex shape requiring a deeper understanding of the area formula․ Hexagons are composed of six equilateral triangles, a key concept for solving related problems․ The worksheet examples typically provide either the side length or the apothem of the regular hexagon․

If the side length is given, students must first determine the apothem using 30-60-90 triangle properties, as the apothem bisects the central angle and forms right triangles․ Alternatively, if the apothem is provided, the side length can be calculated․ Once both values are known, the perimeter is easily determined (6 * side length)․ The area is then calculated using A = (1/2) * apothem * perimeter․

The answer key provides detailed, step-by-step solutions, illustrating how to find the missing dimensions and apply the formula correctly․ These examples emphasize the importance of understanding the relationship between the hexagon’s side length, apothem, and the equilateral triangles it comprises․ Mastering hexagon calculations is crucial for tackling the more challenging octagon problems within the worksheet․

Area of Regular Polygons: Example Problems ― Octagons

The area of regular polygons worksheet presents octagons as a significant challenge, building upon the hexagon examples․ Octagons, with eight sides, require a strong grasp of the area formula and often involve utilizing special right triangles – specifically 45-45-90 triangles – to determine the apothem when only the side length is provided․

Problems typically offer either the side length or the apothem․ If given the side length, students must recognize the 45-45-90 triangle formed by the apothem, half of a side, and a radius․ This allows calculation of the apothem․ Once the apothem and side length are known, the perimeter (8 * side length) is calculated, and finally, the area using A = (1/2) * apothem * perimeter․

The worksheet’s answer key provides detailed solutions, demonstrating the application of the 45-45-90 triangle ratios and the area formula․ These examples highlight the importance of visualizing the octagon as eight congruent isosceles triangles․ Successfully solving octagon problems demonstrates a comprehensive understanding of the concepts presented in the area of regular polygons worksheet․

Using Special Right Triangles to Find Area (Octagons)

A core skill within the area of regular polygons worksheet involves leveraging special right triangles, particularly 45-45-90 triangles, when calculating the area of octagons․ Octagons are frequently presented in problems where the apothem isn’t directly given, necessitating its derivation․

The key lies in recognizing that drawing lines from the center of the octagon to each vertex creates eight congruent isosceles triangles․ Bisecting one of these triangles with the apothem forms a right triangle․ The angle at the center is 360°/8 = 45°, making it a 45-45-90 triangle․

If the side length (s) is known, the base of this right triangle is s/2․ The ratio in a 45-45-90 triangle is 1:1:√2․ Therefore, the apothem (a) = (s/2) * √2․ The worksheet emphasizes this relationship․ Once the apothem is found, the perimeter (8s) is easily calculated, and the area is determined using A = (1/2) * a * P․ The answer key provides step-by-step examples of this process, reinforcing the connection between geometry and trigonometry․

Worksheet Overview: What to Expect

This area of regular polygons worksheet is designed to build proficiency in calculating areas of various regular polygons, including squares, rectangles, triangles, hexagons, and octagons․ Expect a diverse range of problems, starting with simpler scenarios providing all necessary dimensions – apothem and side length – and progressing to more challenging questions requiring you to derive missing values․

The worksheet incorporates both diagrams and word problems, encouraging students to visualize the polygons and translate textual information into mathematical expressions․ A significant portion focuses on applying the core formula: A = (1/2) * Apothem * Perimeter․

Problems will require unit conversions and rounding to the nearest tenth․ Furthermore, some questions will challenge students to utilize their knowledge of special right triangles, particularly when dealing with octagons․ The answer key, included with the PDF, provides detailed solutions for every problem, allowing for self-assessment and error analysis․ The goal is to foster a deep understanding of the concepts, not just memorization of formulas․

Worksheet Problem Types

The area of regular polygons worksheet features a variety of problem types designed to reinforce understanding and application of the area formula․ Expect problems presenting polygons with clearly labeled apothems and side lengths, requiring direct application of A = (1/2) * Apothem * Perimeter․

A significant portion involves calculating the perimeter given the side length or number of sides, then applying the area formula․ Other problems present the area and either the apothem or perimeter, challenging students to work backwards and solve for the missing variable․

We’ve included problems specifically targeting triangles, squares, rectangles, hexagons, and octagons, each with varying levels of difficulty․ Several questions require students to decompose complex shapes into simpler regular polygons to determine total area․ Finally, a section focuses on utilizing special right triangle properties – particularly 45-45-90 and 30-60-90 triangles – to find apothems and side lengths in octagons, preparing students for more advanced geometric challenges․ The PDF includes an answer key․

Solving Worksheet Problems: Step-by-Step Guide

To successfully tackle the area of regular polygons worksheet, follow these steps․ First, carefully identify the given information – apothem, side length, perimeter, or area․ Second, if the perimeter isn’t provided, calculate it by multiplying the side length by the number of sides․ Remember, all sides of a regular polygon are equal!

Third, apply the core formula: Area = (1/2) * Apothem * Perimeter․ Substitute the known values into the formula and perform the calculation․ For problems involving octagons and requiring special right triangles, recall the ratios of sides in 45-45-90 and 30-60-90 triangles to determine missing apothem or side lengths․

Fourth, double-check your units and ensure your answer is expressed in the correct units squared (e;g․, cm², ft²)․ Finally, compare your solution to the answer key provided with the PDF to verify accuracy․ Consistent practice with these steps will build confidence and mastery of regular polygon area calculations․

Answer Key: Detailed Solutions

This section provides comprehensive solutions to each problem within the area of regular polygons worksheet․ Each answer includes a step-by-step breakdown of the calculation process, starting with identifying the given values (apothem, side length, perimeter)․ We demonstrate how to apply the formula: Area = (1/2) * Apothem * Perimeter․

For example, a square with a side of 2cm will have a perimeter of 8cm․ If the apothem is also 2cm, the area is (1/2) * 2cm * 8cm = 8cm²․ Solutions for triangles, hexagons, and octagons will similarly detail perimeter calculations and formula application․ Where special right triangles are involved, the solutions will explicitly show how side ratios were used to find missing dimensions․

The PDF answer key aims to not only provide the correct numerical answer but also to reinforce the understanding of the underlying concepts․ Students can use these detailed solutions to identify areas where they may have struggled and improve their problem-solving skills․

Common Mistakes to Avoid

When working with the area of regular polygons worksheet, several common errors can occur․ A frequent mistake is miscalculating the perimeter, especially when only the side length is provided – remember to multiply the side length by the number of sides! Another pitfall is confusing the apothem with the side length; the apothem is the perpendicular distance from the center to a side․

Incorrectly applying the area formula is also common․ Ensure you’re using Area = (1/2) * Apothem * Perimeter, and not a formula for a different shape․ When dealing with octagons and utilizing special right triangles, students sometimes misapply the 45-45-90 or 30-60-90 triangle ratios․

Finally, pay close attention to units! Ensure all measurements are in the same units before calculating the area․ Reviewing the PDF answer key carefully can help identify these mistakes and reinforce correct procedures․ Consistent practice and careful attention to detail are key to mastering these calculations․

Can a Regular Octagon Have an Area of 10 Units²?

Yes, a regular octagon can indeed have an area of 10 units²․ However, it’s important to understand that this doesn’t necessarily mean the side lengths will be whole numbers or even simple fractions․ The area formula, A = (1/2) * Apothem * Perimeter, allows for a wide range of possible dimensions․

To achieve an area of 10 units², the apothem and perimeter must have a specific relationship․ Using principles from special right triangles (relevant when dissecting an octagon), we can determine that such an octagon would simply have non-integral side lengths․ This highlights that the area doesn’t dictate unique dimensions․

Working through problems on an area of regular polygons worksheet, including those involving octagons, reinforces this concept․ The PDF provides examples demonstrating how to calculate area with varying side lengths and apothems․ It’s a valuable exercise to explore scenarios where the area is fixed, but the dimensions are not․

Resources for Further Practice & Learning

Beyond this area of regular polygons worksheet with answers PDF, numerous resources are available to deepen your understanding․ Websites like Khan Academy offer comprehensive video tutorials and practice exercises covering polygon area calculations, including regular polygons․

Math Monks provides additional worksheets and problem sets, allowing for focused practice on specific polygon types․ Infinite Geometry is a powerful tool for creating customized worksheets tailored to your learning needs, enabling you to generate endless practice problems․

Wayground offers a curated collection of free printables and worksheets, focusing on area calculations and geometric formulas․ Exploring these resources will solidify your grasp of the concepts and build confidence in solving complex problems․ Remember to utilize the answer keys provided with these materials for self-assessment and to identify areas needing further review․ Consistent practice is key to mastering this essential geometric skill!

cuisinart ice cream maker instruction book

Cuisinart Ice Cream Maker Instruction Book: A Comprehensive Guide

Welcome! This comprehensive guide details operation, troubleshooting, and maintenance for your Cuisinart ice cream maker,
covering models ICE-21 series, ensuring delightful frozen treats consistently.

Understanding Your Cuisinart Ice Cream Maker

Your Cuisinart ice cream maker, specifically the ICE-21 series, is designed for fully automatic operation, simplifying the process of creating frozen desserts. Unlike manual churning, this machine handles the mixing for you, requiring only ingredient addition and power activation.

The core functionality relies on a freezing bowl containing a specialized coolant. This coolant, a mixture of water and propylene glycol, pre-freezes and then absorbs heat from the ice cream mixture, causing it to solidify. Understanding this process is crucial; a properly frozen bowl is paramount for successful ice cream making.

The unit features a motor that drives the mixing paddle, incorporating air and creating a smooth texture. Safety features, like motor overheat protection, are integrated to ensure safe operation. Familiarizing yourself with these components and their interplay will maximize your enjoyment and the longevity of your appliance.

Compatible Models: ICE-21 Series

This instruction book is specifically designed for the Cuisinart ICE-21 series of frozen yogurt, ice cream, and sorbet makers. This encompasses a range of model numbers, ensuring broad applicability for owners within this product line. Key compatible models include ICE-21, ICE-21PK, ICE-21PKP1, ICE-21R, and ICE-21RP1.

Further included are ICE-21OR, ICE-21Y, ICE-21PSLT, ICE-21TQ, and ICE-21LAQ. It’s important to verify your model number before referencing specific troubleshooting or maintenance instructions. The information provided within this guide is tailored to the mechanics and features common across all ICE-21 series machines.

Genuine Cuisinart OEM books, like this one, often include instructions in both English and Spanish, alongside helpful recipe sections. Note that condition may vary due to multiple copies being available, potentially with minor cosmetic imperfections.

Key Components and Their Functions

The Cuisinart ice cream maker features several key components working in harmony. The freezer bowl, crucial for freezing, contains coolant that requires pre-freezing for optimal performance. The mixing spout facilitates ingredient addition during operation, ensuring even distribution. The motor base houses the motor and controls the paddle’s rotation.

The mixing paddle itself blends ingredients, incorporating air for a smooth texture. A lid with a viewing window allows monitoring the freezing process. Importantly, a safety feature prevents overheating by automatically stopping the unit if the motor becomes stressed. Understanding each component’s role is vital for efficient operation and troubleshooting.

Regularly checking the coolant’s functionality, as described later, is essential for consistent results. Proper assembly and care of these parts will extend the life of your Cuisinart ice cream maker.

Preparing for Ice Cream Making

Essential preparation involves thoroughly freezing the bowl, verifying it’s properly frozen with the ‘slosh test’, and addressing potential coolant issues before beginning.

Freezing the Bowl: Critical First Step

Achieving optimal freezing of the ice cream bowl is paramount for successful ice cream creation. The bowl must be thoroughly frozen for a minimum of 16-24 hours before initial use, and after each subsequent use. Ensure the freezer is set to a sufficiently low temperature – ideally 0°F (-18°C) or lower.

Place the bowl directly on a flat freezer shelf, avoiding placement on a door or in a location prone to temperature fluctuations. Do not submerge the bowl in water or place it in the dishwasher. A consistently frozen bowl is the foundation for proper heat absorption from the ice cream mixture, enabling the freezing process.

Without adequate freezing, the mixture will remain liquid, regardless of operating time. Remember, the coolant within the bowl is key to this process, and its temperature dictates the outcome.

Checking for Proper Bowl Freezing – The Slosh Test

Before each use, perform the “slosh test” to verify the bowl is adequately frozen. Carefully remove the bowl from the freezer and gently swirl it. If you hear liquid sloshing around inside, the coolant is not fully frozen, and the bowl requires additional freezing time – typically several more hours.

A properly frozen bowl will feel very cold to the touch and will not exhibit any sloshing sounds. Instead, it should feel solid and dense. The absence of sloshing indicates the coolant has solidified, enabling it to effectively absorb heat from the ice cream mixture during churning.

Don’t rely solely on time; the slosh test is the definitive indicator. If it still sloshes, continued freezing is essential for successful ice cream making.

Coolant Issues and Potential Solutions

If your bowl isn’t freezing adequately, the coolant may be the culprit. Over time, the coolant’s freezing point can rise, rendering it ineffective even at standard freezer temperatures. This results in the mixture remaining liquid despite prolonged churning. The slosh test confirms this issue – continued liquid movement indicates a compromised coolant.

A potential solution involves replacing the coolant mixture. The recommended ratio is 70% water and 30% propylene glycol, achieving a freezing point of approximately -14°C (7°F). This requires carefully draining the existing coolant (potentially by drilling small holes), refilling with the correct mixture, and sealing the holes securely.

Caution: This is an advanced repair; proceed with care and research proper sealing techniques.

Diagnosing Coolant Failure

Determining if the coolant is failing requires a simple, yet crucial, test: the “slosh test.” After a sufficient freezing period (typically overnight, or as per the manual), remove the bowl from the freezer. Gently swirl or tilt the bowl. If you hear liquid sloshing around inside, the coolant hasn’t fully frozen, indicating a problem.

A properly frozen bowl will feel solid and exhibit no sloshing sound. The coolant should be completely frozen, forming a solid mass within the bowl’s walls. Consistent failure to freeze, despite adequate freezer time, strongly suggests coolant degradation.

Remember: The coolant’s purpose is to maintain a consistently low temperature, enabling the ice cream mixture to freeze during churning. Without a functioning coolant, the process will be unsuccessful.

Replacing the Coolant (70% Water, 30% Propylene Glycol)

Caution: This procedure requires careful execution. Begin by drilling small holes into the plastic casing of the freezer bowl to drain the existing coolant. Ensure proper ventilation and wear appropriate safety gear. Completely drain the old coolant, then thoroughly rinse the bowl’s interior with clean water.

Mixing the new coolant: Combine 70% distilled water with 30% propylene glycol (available at automotive or hardware stores). A freezing point of approximately -14°C (7°F) is ideal. Carefully pour the mixture into the bowl, leaving a small air gap for expansion during freezing.

Sealing the holes: Securely plug the drilled holes with waterproof sealant or appropriate fasteners to prevent leakage. Allow the bowl to freeze completely before use.

Operating Your Cuisinart Ice Cream Maker

Get ready for deliciousness! Properly assemble the unit, add your chilled ice cream mixture, and let the machine work its magic for optimal results.

Assembling the Unit

Before you begin crafting frozen delights, proper assembly is crucial for optimal performance. First, ensure the freezer bowl is thoroughly frozen – this is non-negotiable! Next, place the assembled dasher into the bowl. The dasher, with its paddle, is responsible for churning and incorporating air into your mixture.

Carefully position the bowl assembly onto the base unit, aligning the drive shaft with the opening in the base. A secure fit is essential; it should click into place. Now, attach the clear cover. This cover prevents splattering during the mixing process and allows you to monitor the ice cream’s consistency.

Finally, locate the mixing spout on the cover. This is where you’ll gradually pour in your ice cream mixture. Double-check all components are correctly aligned and securely fastened before powering on the machine. A properly assembled unit guarantees smooth operation and delicious results!

Adding the Ice Cream Mixture

With the unit assembled, it’s time to introduce your carefully prepared ice cream mixture. Ensure the machine is powered off before beginning. Locate the mixing spout on the clear cover – this is your entry point. Slowly and steadily pour the mixture into the spout.

Avoid overfilling; leave at least one inch of headspace within the bowl to accommodate expansion during churning. Overfilling can lead to spillage and hinder proper freezing. The mixture will begin to churn immediately upon powering on the machine, so a controlled pour is key.

Remember, the mixture will thicken significantly as it freezes. Monitor the consistency through the clear cover. Resist the urge to lift the cover during operation, as this can disrupt the freezing process. A gradual addition ensures even freezing and a perfectly textured final product.

The Mixing Process: Step-by-Step

Once the ice cream mixture is added, securely place the clear cover onto the base, ensuring it clicks into position. Plug in the unit and power it on. The dasher will begin to rotate, initiating the freezing process. Allow the machine to run for approximately 20-25 minutes, or until the mixture reaches your desired consistency – typically a soft-serve texture.

Understanding the Mixing Spout: This allows for optional ingredient additions during churning, like chocolate chips or fruit.

Optimal Mixing Time: Varies based on recipe and ambient temperature. Monitor closely; over-churning results in a grainy texture. The machine will automatically shut off when finished.

Understanding the Mixing Spout

The mixing spout, located on the lid of your Cuisinart ice cream maker, is a crucial feature for customizing your frozen desserts. It allows you to introduce solid ingredients – such as chocolate chips, chopped nuts, fruit pieces, or cookie crumbles – during the churning process, ensuring even distribution throughout the ice cream.

To utilize the spout, gently lift the clear cover’s flap and slowly pour in your desired additions. Avoid adding large quantities at once, as this can overwhelm the machine and potentially cause it to stop. Continue churning for a few more minutes to fully incorporate the ingredients.

Remember: Adding ingredients too early can result in them becoming frozen and brittle, while adding them too late may lead to uneven distribution.

Optimal Mixing Time

Determining the optimal mixing time is key to achieving the perfect ice cream consistency; Generally, a mixing time of 20-25 minutes is sufficient for most recipes, but this can vary depending on the recipe itself, the ambient temperature, and the desired firmness.

Soft-serve consistency will be reached around 20 minutes, ideal for immediate enjoyment. For a firmer, scoopable texture, allow the machine to run for the full 25 minutes. Observe the mixture closely; it should thicken considerably and pull away from the sides of the bowl.

Don’t overmix! Prolonged churning can result in a grainy texture. Once the desired consistency is achieved, immediately remove the bowl from the unit.

Troubleshooting Common Issues

Facing problems? This section addresses frequent concerns like ice cream not freezing, motor overheating, or the unit failing to power on, offering practical solutions.

Ice Cream Not Freezing: Common Causes

Why isn’t your ice cream freezing? The most frequent culprit is an improperly frozen bowl. Ensure it’s been in the freezer for a minimum of 24 hours, ideally longer, before use. A crucial test is the “slosh test” – a properly frozen bowl will have a solid, non-sloshing coolant inside.

If the bowl still sloshes, the coolant may have lost its freezing capability. Over time, the 70% water and 30% propylene glycol mixture can degrade, raising its freezing point. This means your freezer isn’t cold enough to solidify the coolant, preventing it from effectively freezing the ice cream mixture.

Other potential causes include an insufficient amount of ice cream mixture, a mixture that isn’t cold enough before adding it to the machine, or a malfunctioning motor. Always verify the unit is correctly assembled and plugged in, and that the mixing arm is properly attached.

Motor Overheating and Safety Features

Protecting your Cuisinart ice cream maker, the unit is equipped with a vital safety feature: automatic shut-off due to motor overheating; This prevents damage to the motor and ensures user safety. Overheating can occur if the mixture is too thick, the unit is overworked, or there’s insufficient ventilation.

If the motor stops during operation, immediately unplug the machine and allow it to cool completely – typically 30-60 minutes – before attempting to restart. Avoid forcing the unit to operate if it has overheated. Ensure the mixing mixture isn’t overly dense, as this places extra strain on the motor.

Regularly check for any obstructions around the motor housing that might restrict airflow. Proper ventilation is crucial for preventing overheating. Do not immerse the motor housing in water or any other liquid.

Unit Not Turning On: Possible Reasons

If your Cuisinart ice cream maker fails to power on, several factors could be at play. First, verify the unit is securely plugged into a functioning electrical outlet. Test the outlet with another appliance to confirm it’s providing power.

Next, check the power cord for any visible damage, such as cuts or fraying. A damaged cord must be replaced by a qualified technician. Ensure the mixing bowl and dasher are correctly assembled and locked into place; a safety interlock prevents operation if components aren’t properly aligned.

If these steps don’t resolve the issue, the motor itself may be faulty. Contact Cuisinart customer support for assistance or potential repair options. Do not attempt to disassemble the unit yourself, as this could void the warranty and pose a safety risk.

Recipes and Inspiration

Unleash your creativity! Explore basic ice cream recipes, frozen yogurt variations, and sorbet delights, with a complete recipe booklet available in English and Spanish.

Basic Ice Cream Recipe

Classic Vanilla Ice Cream: This foundational recipe serves as a perfect starting point for your Cuisinart ice cream adventures. You’ll need 2 cups of heavy cream, 1 cup of whole milk, ¾ cup of granulated sugar, and 1 tablespoon of pure vanilla extract.

Instructions: In a saucepan, combine the cream, milk, and sugar. Heat gently over medium heat, stirring constantly until the sugar is completely dissolved. Do not boil! Remove from heat and stir in the vanilla extract.

Chill the mixture thoroughly in the refrigerator for at least 2 hours, or preferably overnight. This ensures optimal freezing. Once chilled, pour the mixture into your pre-frozen Cuisinart ice cream maker bowl and follow the operating instructions for the mixing process. Expect approximately 20-25 minutes of churning for a soft-serve consistency; For a firmer texture, transfer to a freezer-safe container and freeze for an additional 2-4 hours.

Frozen Yogurt and Sorbet Variations

Frozen Yogurt: Substitute 2 cups of plain or flavored yogurt for the cream and milk in the basic ice cream recipe. Adjust sugar to taste, as yogurt already contains some sweetness. For a tangier flavor, use Greek yogurt.

Strawberry Sorbet: Blend 2 cups of fresh or frozen strawberries with ¾ cup of water and ½ cup of sugar until smooth. Strain the mixture to remove seeds for a smoother texture. Chill thoroughly before churning in your Cuisinart ice cream maker.

Lemon Sorbet: Combine 1 cup of lemon juice, ¾ cup of water, and ¾ cup of sugar. Stir until sugar dissolves. Chill, then churn. Experiment with other fruit purees – mango, raspberry, or peach – for endless sorbet possibilities! Remember to adjust sugar levels based on fruit sweetness.

Recipe Booklet Availability (English & Spanish)

Genuine Cuisinart OEM booklets are frequently available, offering a delightful collection of recipes to inspire your frozen dessert creations. These booklets, presented in both English and Spanish, provide a fantastic starting point for exploring the versatility of your Cuisinart ice cream maker.

While some booklets may exhibit minor wear, such as folded corners, they remain a valuable resource. Note that registration cards and quick instruction sheets may not always be included with used booklets. Multiple copies are often available, meaning condition can vary slightly.

These booklets complement the user manual, expanding your repertoire beyond basic recipes. They are specifically designed for compatible models like ICE-21, ICE-21PK, and others within the series, ensuring recipe success.

Maintenance and Care

Proper cleaning and storage are essential for longevity. Regularly clean all components and store the unit safely, ensuring optimal performance for years of enjoyment.

Cleaning Your Cuisinart Ice Cream Maker

Thorough cleaning after each use is crucial to prevent bacteria growth and maintain optimal performance. Begin by unplugging the unit and disassembling all removable parts: the bowl, dasher, lid, and mixing spout.

Wash these components in warm, soapy water. Avoid abrasive cleaners or scouring pads, as they can damage the surfaces. The bowl, containing the coolant, should never be placed in the dishwasher. Rinse all parts thoroughly and allow them to air dry completely before reassembling.

The motor base can be wiped down with a damp cloth. Never immerse the motor base in water or any other liquid. Ensure no water enters the motor housing. For stubborn residue, a mild detergent solution can be used, followed by a clean, damp wipe. Proper cleaning ensures hygienic and flavorful ice cream creations every time.

Storage Instructions

Proper storage extends the life of your Cuisinart ice cream maker and ensures it’s ready for your next frozen dessert adventure. Before storing, ensure all components are completely clean and dry, as detailed in the cleaning section.

The freezer bowl requires special attention. It should be stored in the freezer to maintain its frozen state, ready for immediate use. Store the bowl separately to avoid damage from other items. The dasher, lid, and mixing spout can be stored in a cool, dry place, away from direct sunlight.

The motor base should be stored in a dry environment, protected from dust and moisture. Avoid tightly wrapping the cord, as this can cause damage. Keep the original packaging for safe and convenient storage when not in use for extended periods.

Genuine Cuisinart OEM Book Information

Authenticity matters! This instruction booklet is a genuine Cuisinart Original Equipment Manufacturer (OEM) publication, designed specifically for your Cuisinart frozen yogurt, ice cream, and sorbet maker. Presented in both English and Spanish, it provides comprehensive guidance for optimal performance and safety.

This booklet includes a dedicated section filled with delicious recipes to inspire your creations. Please note that due to being pre-owned, copies may exhibit minor wear, such as folded corners. The original registration card and quick instruction sheet may not be included.

We offer multiple copies, so the condition may slightly vary. Compatible models include ICE-21, ICE-21PK, ICE-21PKP1, ICE-21R, ICE-21RP1, ICE-21OR, ICE-21Y, ICE-21PSLT, ICE-21TQ, and ICE-21LAQ.

hayward pool pump timer manual

Hayward Pool Pump Timer Manual: A Comprehensive Guide

Navigating pool pump operation? This guide details Hayward timer installation, programming, troubleshooting, and energy-saving features for optimal pool care and efficiency․

Understanding Hayward Pool Pump Timers

Hayward pool pump timers are essential for automating your pool’s circulation system, leading to energy savings and consistent water quality․ These devices control when your pump operates, eliminating the need for manual on/off switching․ Properly utilizing a timer extends pump lifespan and reduces electricity consumption․ Understanding the timer’s functions—from basic scheduling to advanced features—is key to maximizing its benefits․ They offer convenience and contribute to responsible pool ownership, ensuring a clean and enjoyable swimming experience․

Types of Hayward Pool Pump Timers

Hayward offers diverse timer options to suit various pool setups and user preferences․ Digital timers provide precise control with programmable schedules, often featuring multiple on/off cycles and holiday modes․ Mechanical timers, while simpler, offer reliable operation through a rotating dial, setting specific run times․ Choosing the right type depends on your desired level of automation and technical comfort․ Both effectively manage pump operation, contributing to energy efficiency and pool maintenance․

Digital Timers

Hayward’s digital timers offer advanced control over your pool pump․ These models feature a user-friendly interface for precise programming of multiple on/off cycles daily․ Features often include a real-time clock, date setting, and holiday/vacation modes for customized scheduling․ Digital displays simplify operation, and some models allow remote control via smartphone apps, maximizing convenience and energy savings․ They are ideal for users seeking detailed automation․

Mechanical Timers

Hayward’s mechanical timers provide a simpler, more traditional approach to pool pump control․ Utilizing rotating dials and pins, these timers allow for easy setup of on/off schedules without complex programming․ While lacking the advanced features of digital models, they are reliable and cost-effective․ Mechanical timers are a good choice for basic scheduling needs and are known for their durability and straightforward operation, requiring minimal technical expertise․

Timer Installation

Proper installation is crucial for reliable timer operation․ Begin by disconnecting power to the pump before any wiring․ Carefully connect the wires according to the timer’s wiring diagram, ensuring secure connections․ Mount the timer in a protected location, shielded from direct weather and excessive moisture․ Double-check all connections and the mounting before restoring power, verifying correct functionality post-installation for optimal performance and safety․

Wiring Considerations

Always disconnect power before commencing any wiring․ Match wire colors carefully – typically, black to black (line voltage), white to white (neutral), and green or bare copper to ground․ Ensure wire nuts are securely fastened․ Verify the timer’s voltage compatibility with your pump’s requirements․ Incorrect wiring can damage the timer or pump, creating a safety hazard․ Consult a qualified electrician if unsure about any aspect of the wiring process․

Mounting the Timer

Select a protected location, shielded from direct sunlight and weather exposure․ Mount the timer securely to a stable surface using appropriate screws – avoid over-tightening․ Ensure sufficient space around the timer for easy access to wiring and programming․ Consider proximity to the pump and electrical supply for shorter wire runs․ Proper mounting prevents damage and ensures reliable operation․ Verify the enclosure is rated for outdoor use if necessary․

Programming Your Hayward Timer

Hayward timers offer automated control of your pool pump․ Begin by understanding the timer’s interface – buttons or a digital display․ Accurate programming is crucial for energy savings and proper pool maintenance․ This section details setting the current time and date, and creating on/off schedules tailored to your pool’s needs․ Explore advanced features for customized control, ensuring optimal water circulation and filtration․

Setting the Current Time and Date

Accurate time and date settings are fundamental for correct timer operation․ Consult your specific model’s manual, as procedures vary․ Typically, you’ll use buttons labeled “Hour,” “Minute,” and “Date” to adjust these settings․ Ensure the timer displays the correct time format (AM/PM or 24-hour)․ Proper synchronization guarantees schedules activate at the intended times, maximizing efficiency and pool health․

Creating Basic On/Off Schedules

Basic scheduling involves defining start and stop times for your pump․ Most Hayward timers allow multiple on/off cycles daily․ Use the “Program” or “Set” buttons to input desired run times․ Consider your pool’s needs – typically, 8-12 hours of circulation is sufficient․ Review the schedule carefully to avoid unintended operation or insufficient filtration, ensuring a clean and healthy swimming environment․

Advanced Timer Features

Hayward timers offer features beyond simple on/off cycles․ Multiple schedules allow customized settings for different days, accommodating varying pool usage․ Holiday/Vacation Mode provides extended run times for increased circulation during periods of heavy use or absence, preventing algae growth․ Explore these options to optimize performance and maintain pristine water quality effortlessly․

Multiple Schedules

Hayward timers excel with the ability to program distinct schedules for each day of the week․ This feature caters to varied pool usage patterns – shorter runs on weekdays, longer on weekends․ Customize start times and durations individually, ensuring efficient operation and tailored water circulation․ Maximize energy savings and maintain optimal pool conditions with personalized scheduling․

Holiday/Vacation Mode

Planning an extended absence? Utilize the Holiday/Vacation mode on your Hayward timer to maintain pool water quality while conserving energy․ This function typically runs the pump for a brief period each day, preventing algae growth and stagnation․ It’s a smart solution for worry-free pool care during trips, ensuring a clean and inviting pool upon your return․

Troubleshooting Common Timer Issues

Experiencing timer malfunctions? Common problems include the timer failing to activate the pump or display errors․ First, verify the power supply and wiring connections․ If the display is blank, check the battery (if applicable)․ For unresponsive timers, attempt a reset․ If issues persist, consult the Hayward manual or a qualified technician to diagnose and resolve the problem efficiently, ensuring optimal pool operation․

Timer Not Turning Pump On/Off

Pump failing to respond to the timer? Initially, confirm the timer is correctly programmed with accurate on/off schedules․ Inspect wiring connections for looseness or corrosion․ Verify the pump’s breaker hasn’t tripped․ A faulty timer relay could also be the culprit, requiring replacement․ Ensure the timer’s override function isn’t engaged․ If problems continue, professional assistance is recommended for a thorough diagnosis․

Display Problems

Experiencing a blank or malfunctioning display? First, check the battery – a low battery often causes display issues in digital timers․ Ensure the timer is receiving proper power․ If the display is dim, try adjusting the contrast settings․ For unresponsive displays, a reset might help; consult your model’s manual․ Persistent problems suggest a potential internal failure, necessitating timer replacement or professional repair․

Hayward Timer Model Specific Information

Hayward offers diverse timer models․ The ECB series provides basic, reliable timing, ideal for simple setups․ EFPT models feature enhanced programmability and often include advanced functions like multiple schedules and holiday modes․ Always refer to the specific manual for your model – ECB, EFPT, or others – as programming steps and features vary significantly․ Understanding your model ensures optimal performance and customization․

ECB Series Timers

ECB timers are known for their simplicity and durability; Programming involves setting “on” and “off” times using a rotating dial․ These mechanical timers lack the advanced features of digital models, but offer dependable operation․ Ensure the dial is accurately positioned for desired schedules․ Regularly check the timer’s mechanism for smooth rotation, and consult the manual for specific operational details and troubleshooting tips․

EFPT Series Timers

EFPT timers represent Hayward’s digital offerings, providing enhanced control and flexibility․ These models feature a digital display and button interface for precise programming of on/off cycles․ They often include features like multiple schedules and override options․ Refer to the specific EFPT model’s manual for detailed instructions on navigating the menu and setting parameters․ Proper programming ensures efficient pump operation and energy savings․

Energy Saving Tips with Timer Use

Maximize efficiency by optimizing pump run times with your Hayward timer․ Run the pump during off-peak hours when electricity rates are lower․ Consider shorter cycles, especially during cooler months, and integrate with variable speed pumps for further savings․ Regularly review and adjust schedules based on pool usage and weather conditions to minimize energy consumption and costs․

Optimizing Pump Run Times

Achieve significant energy savings by carefully adjusting pump run times․ Most pools don’t require 24/7 filtration; 8-12 hours is often sufficient․ Utilize your Hayward timer to schedule operation during cooler parts of the day or off-peak electricity hours․ Analyze your pool’s needs – heavy use demands longer runs, while minimal use allows for shorter cycles, reducing overall energy expenditure․

Variable Speed Pump Integration

Hayward variable speed pumps offer unparalleled efficiency when paired with a timer․ Instead of simple on/off cycles, program the timer to adjust pump speed throughout the day․ Run at lower speeds for circulation and filtration, increasing speed only when needed for cleaning or features․ This maximizes energy savings and extends pump lifespan, providing substantial cost reductions․

Hayward Pool Pump Regulations & Timers

Recent regulations prioritize energy efficiency for pool pumps․ Timers are crucial for compliance, ensuring pumps operate only when necessary․ Variable speed pumps, often mandated, benefit greatly from precise timer scheduling․ Understanding local rules regarding run times and pump speeds is vital․ Hayward timers facilitate adherence, potentially avoiding penalties and maximizing energy conservation efforts for responsible pool ownership․

Impact of Regulations on Timer Settings

New regulations significantly influence Hayward timer programming․ Fixed-speed pumps now require stricter runtime limitations, demanding precise on/off schedules․ Variable speed pumps necessitate programming for multiple, lower-speed settings throughout the day․ Timers must reflect these changes to ensure legal operation and avoid energy waste․ Careful consideration of local guidelines is essential when configuring your Hayward timer for optimal compliance and cost savings․

Maintaining Your Hayward Timer

Regular maintenance extends your Hayward timer’s lifespan․ Periodically clean the timer housing with a damp cloth, avoiding harsh chemicals․ For models with batteries, replace them annually to prevent inaccurate timekeeping or programming errors․ Inspect wiring connections for corrosion or looseness․ Proper care ensures reliable operation, preventing unexpected pump shutdowns and maintaining efficient pool management․ A well-maintained timer contributes to long-term cost savings․

Cleaning the Timer Housing

Keep your Hayward timer looking and functioning optimally with simple cleaning․ Disconnect power before cleaning! Use a soft, damp cloth to wipe down the exterior housing, removing dust and debris․ Avoid abrasive cleaners or solvents, as these can damage the plastic casing or affect internal components․ Ensure the timer is completely dry before restoring power․ Regular cleaning prevents buildup and maintains a clear display․

Battery Replacement (if applicable)

Some Hayward timers utilize batteries for backup during power outages, preserving programmed settings․ Check your model’s manual to confirm battery requirements․ When the low battery indicator appears, carefully replace the battery with the correct type, following the polarity markings․ Ensure a snug fit․ Battery replacement prevents program loss and ensures continued timer functionality during brief power interruptions․

Safety Precautions

Prioritize safety when installing and maintaining your Hayward timer․ Always disconnect power at the breaker before working with electrical components․ Ensure the timer is housed in a dry location, protected from the elements․ Incorrect wiring can cause electrical shock or damage equipment․ Follow all local electrical codes and regulations․ If unsure, consult a qualified electrician for assistance․

Electrical Safety

Crucially, disconnect power at the breaker before any wiring or maintenance․ Verify the timer is properly grounded to prevent shocks․ Never work with wet hands or in damp conditions․ Ensure all connections are tight and secure, avoiding loose wires․ Use appropriately sized wiring for the load․ If you detect any burning smells or sparking, immediately shut off power and consult an electrician․

Timer Placement

Select a location protected from direct sunlight and weather exposure․ Mount the timer in a dry, well-ventilated area, away from pool chemicals and corrosive substances․ Ensure easy access for programming and maintenance, but secure enough to prevent tampering․ Avoid locations prone to flooding or excessive moisture․ A shaded, sheltered spot near the pump is generally ideal for convenient operation․

Resources and Support

Need further assistance? Visit Hayward’s official website for detailed manuals, FAQs, and troubleshooting guides․ Explore online forums and communities dedicated to pool maintenance for peer support and shared experiences․ Contact Hayward’s customer service directly for personalized help with your timer․ Utilize WeTransfer for sharing diagnostic information with support teams efficiently․

Hayward’s Official Website

Hayward’s website is the primary resource for comprehensive support․ Access detailed manuals for all timer models, including the ECB and EFPT series․ Find FAQs addressing common programming and troubleshooting questions․ Download installation guides and wiring diagrams․ Explore parts lists and locate authorized Hayward service providers near you for professional assistance and genuine replacement parts․

Online Forums and Communities

Pool-specific online forums offer a valuable platform for peer-to-peer support regarding Hayward timers․ Share experiences, ask questions, and find solutions from fellow pool owners facing similar challenges․ These communities often contain detailed discussions on specific timer models and troubleshooting tips not found elsewhere․ Benefit from collective knowledge and gain insights into optimizing your timer settings․